Custom Lighting Procurement: From Drawings and Samples to Production
Separate appearance approval from component and technical approval. A chandelier can match the rendering while its driver, suspension detail or maintenance access remains unresolved. Keep one revision record linking the drawing, metal finish, light source, driver and approved sample; a change to one item should trigger a review of its interfaces.
Custom decorative lighting procurement is a technical development process that converts a design concept into a repeatable manufactured product. A reference image or concept drawing can establish the visual direction, but it does not provide enough information for accurate quotation, sampling or mass production.
For hotels, restaurants, commercial spaces and luxury residential projects, the procurement process should connect design drawings, dimensions, materials, finishes, electrical specifications, physical samples and approved production standards. The objective is to ensure that the lighting produced in quantity remains consistent with the design intent and approved sample.
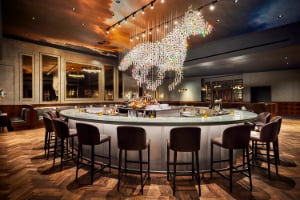
Release Lighting Orders by Approval Status
Separate appearance approval from component and technical approval. A chandelier can match the rendering while its driver, suspension detail or maintenance access remains unresolved. Keep one revision record linking the drawing, metal finish, light source, driver and approved sample; a change to one item should trigger a review of its interfaces.
For example, replacing a driver after sample approval is a proposed specification change, not an interchangeable purchasing decision. Confirm compatibility and documentation before releasing the revised bill of materials. This prevents the purchasing team from ordering against a different configuration from the one the project team reviewed.
1. Start with the Lighting Design Brief
The process begins with the approved project information.
The design brief should identify:
| Project Type | Project Area |
| Fixture Type | Design Reference |
| Required Quantity | Target Dimensions |
| Material Direction | Finish Direction |
This provides the starting point for technical development.
2. Build the Custom Lighting BOQ
Each custom fixture should have a unique item code.
The BOQ should include:
Item Code → Area → Fixture Type → Dimensions → Materials → Finish → Quantity → Electrical Requirements
The same item code should remain consistent throughout drawings, sampling, production, QC, packing and delivery.
3. Separate Standard and Custom Fixtures
Not every fixture requires the same development process.
The project can distinguish between:
| Standard Repeated Fixtures | Modified Standard Fixtures |
| Fully Custom Fixtures | Large Feature Lighting |
This allows technical resources and sample development to focus on the fixtures that require the most coordination.
4. Review the Design Drawings
Design drawings establish the intended appearance and relationship with the interior.
Review:
Overall Shape → Proportions → Dimensions → Materials → Decorative Components → Mounting Position
Any unclear information should be resolved during technical development rather than during mass production.
5. Convert Design Intent into Technical Information
The manufacturer needs to translate the design into manufacturable construction.
Technical development should define:
| Main Structure | Material Thickness |
| Connections | Decorative Components |
| Suspension | Canopy / Backplate |
| Electrical Components | Assembly Method |
This is the point where a visual concept becomes a manufacturing specification.
6. Confirm Overall Fixture Dimensions
The drawing should identify the critical dimensions.
These can include:
Width → Depth → Fixture Height → Overall Drop → Canopy Size → Backplate Size
Dimensions should correspond with the approved architectural space.
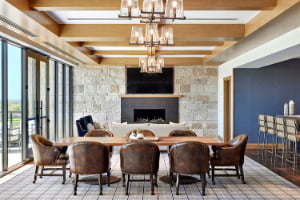
7. Coordinate Dimensions with the Space
A custom fixture should not be developed independently from its architectural location.
Review the relationship between:
Ceiling Height → Fixture Dimensions → Furniture Layout → Finished Drop → Circulation → Visual Scale
This is particularly important for chandeliers and feature pendants.
8. Confirm Suspension Length
For suspended fixtures, define the complete vertical dimension.
Record:
| Fixture Body Height | Suspension Length |
| Canopy Height | Overall Drop |
| Adjustable Range | Finished Fixture Level |
Do not leave suspension dimensions undefined until production.
9. Develop the Structural Construction
The internal structure should support the fixture design and its decorative components.
Technical development should consider:
Frame → Arms → Connections → Suspension → Component Support → Assembly
Large custom fixtures can require a more complex structural solution than their external appearance suggests.
10. Define the Main Materials
Each material should be identified in the technical specification.
Custom lighting can combine:
| Metal | Glass |
| Stone | Fabric |
| Crystal | Acrylic / Resin |
| Decorative Components | Approved Project Materials |
Material selections should correspond with the approved design direction.
11. Develop Metal Components
Metal components can require several manufacturing processes.
A typical sequence can include:
Cutting → Forming → Welding → Grinding → Surface Preparation → Finishing
The actual process depends on the fixture construction.
12. Develop Glass Components
Custom glass should be defined by more than shape alone.
Specify:
| Dimensions | Shape |
| Color | Transparency |
| Texture | Thickness |
| Edge Detail | Surface Appearance |
Repeated glass components should follow the same approved reference.
13. Develop Fabric Shades
For fixtures using fabric shades, define:
Dimensions → Shape → Frame → Fabric → Lining → Edge Detail → Color
Shade proportions should be evaluated together with the complete fixture rather than separately.
14. Develop Other Decorative Components
Custom lighting can contain stone, crystal, acrylic, resin or other decorative elements.
For each component, establish:
| Material | Dimensions |
| Color | Texture |
| Position | Connection Method |
| Approved Reference | Quantity per Fixture |
This creates a controlled component specification.
15. Define Metal Finishes
Finish descriptions should be supported by an approved reference.
Specify:
Color → Texture → Gloss → Surface Direction → Finish Process → Approved Sample
Names such as brushed brass or antique bronze alone may not provide a sufficiently precise visual standard.
16. Develop Finish Samples
Physical finish samples allow the project team to review the actual surface before the complete fixture is produced.
Review:
| Color | Texture |
| Gloss | Surface Character |
| Material Interaction | Overall Appearance |
Approved samples should be clearly identified and retained as production references.
17. Coordinate Finishes Across Fixtures
A project can contain multiple custom fixtures using related finishes.
The approved finish should remain coordinated across:
Chandeliers → Pendants → Wall Lights → Table Lamps → Floor Lamps
This is especially important when the fixtures are visible within connected hotel or commercial spaces.
18. Define Electrical Specifications
Electrical requirements should be established during technical development.
Depending on the fixture, record:
| Voltage | Lamp Source |
| Wattage | Color Temperature |
| Lamp Holder | Driver |
| Dimming Requirement | Project Requirement |
The specification should correspond with the actual project destination.
19. Confirm Project and Destination Requirements
Before electrical components are finalized, confirm the destination market and applicable project requirements.
The process should follow:
Project Destination → Required Specification → Electrical Components → Required Documentation
This prevents late changes to completed products.
20. Coordinate the Light Source with the Fixture
The light source can influence the fixture’s visual appearance.
Review:
Light Source Position → Decorative Material → Glass → Shade → Light Distribution → Finished Appearance
The technical and visual requirements should be considered together.
21. Complete the Technical Drawing
After dimensions, materials, construction and electrical information are confirmed, prepare the manufacturing drawing.
The drawing should communicate:
| Overall Dimensions | Construction |
| Material References | Finish References |
| Component Positions | Suspension |
| Canopy / Backplate | Electrical Information |
The final drawing becomes an important reference for sample development.
22. Review the Drawing Before Sampling
Before making the physical sample, review the technical information against the original design.
Confirm:
Design Intent → Dimensions → Proportions → Materials → Finishes → Electrical Requirements
This review reduces unnecessary sample revisions.
23. Develop the Physical Sample
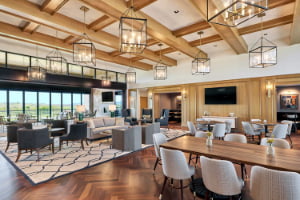
The sample converts the technical information into a physical product.
It allows the project team to evaluate aspects that drawings cannot fully communicate.
These include:
| Real Proportions | Material Appearance |
| Finish Quality | Glass Appearance |
| Shade Proportion | Assembly |
| Lighting Effect | Overall Workmanship |
24. Compare the Sample with the Drawing
The physical sample should be checked against the approved technical drawing.
Review:
Width → Height → Overall Drop → Component Dimensions → Construction → Decorative Details
Any dimensional differences should be recorded.
25. Review Material Accuracy
Confirm that the materials used in the sample correspond with the approved references.
Check:
| Metal | Glass |
| Fabric | Stone |
| Crystal | Acrylic / Resin |
| Decorative Components | Hardware |
Unapproved substitutions should not automatically become the production standard.
26. Review Finish Accuracy
Compare the sample directly with the approved finish reference.
Review:
Color → Texture → Gloss → Surface Direction → Uniformity
The complete fixture can reveal finish differences that are less obvious on a small sample.
27. Review Fixture Proportions
Physical sampling provides an opportunity to evaluate the real scale of the fixture.
Check the relationship between:
| Fixture Body | Decorative Components |
| Frame | Glass |
| Shade | Suspension |
| Canopy | Overall Dimensions |
The proportions should remain consistent with the intended design.
28. Review Electrical Performance
The sample should also confirm the approved electrical configuration.
Review the relevant:
Light Source → Wiring → Lamp Holder → Driver → Connections → Dimming Components
Requirements should correspond with the approved project specification.
29. Review the Lighting Appearance
When appropriate, review the fixture illuminated.
Consider:
| Color Temperature | Light Appearance |
| Glass Effect | Shade Effect |
| Decorative Reflection | Overall Visual Character |
This helps evaluate the relationship between materials and the light source.
30. Record Sample Comments
All required changes should be documented.
Comments can cover:
Dimensions → Materials → Finish → Glass → Shade → Construction → Electrical Components → Decorative Details
Verbal changes alone should not become the basis for mass production.
31. Revise the Technical Drawing
After sample review, update the technical information to reflect approved modifications.
The revised drawing should replace superseded versions.
Maintain:
| Revision Number | Revision Date |
| Changed Details | Current Approval Status |
Production should use only the current approved version.
32. Approve the Final Sample
Once the required changes are completed, the final sample can establish the production benchmark.
Approval should cover:
Dimensions → Construction → Materials → Finishes → Electrical Specification → Workmanship → Overall Appearance
The approved sample and approved drawing should correspond with each other.
33. Freeze the Production Specification
Before mass production, consolidate the final approved information.
The production package should contain:
| Final Drawing | Final BOQ |
| Approved Materials | Approved Finishes |
| Electrical Specification | Approved Sample Reference |
| Required Quantity | Packing Requirement |
This establishes one controlled manufacturing reference.
34. Prepare Production Materials
Materials and components should be prepared according to the approved specification.
Production planning can include:
Metal Components → Glass → Shades → Decorative Components → Electrical Components → Hardware
Incoming materials should be checked against the approved references where required.
35. Control First Production Units
The first completed production units should be compared with the approved sample before the remaining quantity progresses.
Check:
| Dimensions | Construction |
| Materials | Finish |
| Glass | Shades |
| Electrical Components | Overall Appearance |
This helps identify production variation early.
36. Control Metal Production
During mass production, check:
Cutting → Forming → Welding → Grinding → Surface Preparation → Finish
Repeated structural components should remain dimensionally consistent.
37. Control Decorative Components
Glass, stone, crystal and other repeated components should be monitored for consistency.
Review:
| Dimensions | Shape |
| Color | Texture |
| Transparency | Surface Quality |
| Edge Finish | Overall Appearance |
Small variations can become highly visible when many components are assembled into one fixture.
38. Control Finish Consistency
Mass production should remain consistent with the approved finish sample.
Compare:
Production Batch → Approved Reference → Completed Fixture
Particular attention should be given to fixtures that use the same finish across different product types.
39. Control Assembly
During assembly, inspect:
| Alignment | Symmetry |
| Component Position | Connections |
| Glass Position | Shade Position |
| Decorative Details | Overall Structure |
The finished fixture should reproduce the approved sample.
40. Control Electrical Components
Electrical components should remain consistent with the approved project specification.
Verify:
Wiring → Lamp Holders → Drivers → Light Sources → Connections → Required Components
Changes should not be introduced without approval.
41. Complete Final Quality Control
Before packing, inspect the finished fixtures.
Final QC should cover:
| Item Code | Dimensions |
| Construction | Materials |
| Finish | Decorative Components |
| Assembly | Electrical Specification |
| Workmanship | Appearance |
| Quantity | Accessories |
Inspection should be performed against the approved production standard.
42. Plan Packing During Product Development
Packing should not be considered only after production is finished.
Custom lighting can contain fragile, oversized or irregular components.
During development, consider:
Fixture Size → Component Breakdown → Glass Protection → Finish Protection → Shade Protection → Transportation
Large fixtures can require dedicated packing solutions.
43. Separate Large Fixtures into Components
Oversized chandeliers and feature lighting can require component breakdown for export transportation.
Separate components can include:
| Main Structure | Suspension Parts |
| Canopy | Glass |
| Shades | Decorative Components |
| Hardware | Accessories |
Each part should remain traceable to the correct fixture.
44. Use Project-Based Labels
Every package should be identifiable.
Labels can contain:
Project → Area → Item Code → Fixture → Quantity → Package Number → Component Reference
This is particularly important when one fixture is packed in multiple cases.
45. Prepare the Final Packing List
The packing list should correspond with the lighting BOQ.
A practical structure is:
| Item Code | Product Description |
| Quantity | Package Number |
| Component Reference | Destination |
This maintains traceability through export delivery.
46. Maintain Revision Control Throughout Procurement
Custom lighting can change several times between initial drawing and production.
Maintain control over:
Design Drawing → Technical Drawing → Sample Revision → Approved Drawing → Approved Sample → Production Specification
Superseded versions should not remain active production references.
47. Manage the Complete Custom Lighting Workflow
A controlled custom lighting procurement process follows:
Design Brief → Lighting BOQ → Design Drawings → Technical Development → Material & Finish Samples → Technical Drawings → Physical Sample → Sample Review → Drawing Revision → Final Sample Approval → Mass Production → Quality Control → Project-Based Packing → Export Delivery
Each stage should connect to the same project item code and approved specification.
Conclusion
Custom lighting procurement is the process of transforming a design concept into a controlled and repeatable manufactured product.
Drawings establish dimensions and construction. Material and finish samples establish the visual standard. Physical lighting samples allow proportions, workmanship, materials, electrical configuration and appearance to be reviewed before mass production. The approved drawing and approved sample then become the benchmarks for production and quality control.
The complete process can therefore follow:
Design Drawings → Technical Development → Material & Finish Approval → Technical Drawings → Sample Development → Sample Review → Final Approval → Production Specification → Mass Production → Quality Control → Project-Based Packing → Export Delivery
For hotel and commercial projects containing multiple custom fixtures, this structured process helps maintain design intent, finish consistency, manufacturing accuracy and project traceability from the first drawing through final delivery.
Decorative Lighting Procurement & Production Questions
What information is required to start a custom lighting project?
The starting information should include the project area, fixture design or reference, dimensions, quantities, material direction, finish requirements, electrical requirements, destination and project schedule.
Why are technical drawings necessary for custom lighting?
Technical drawings convert the design concept into measurable manufacturing information, including dimensions, construction, materials, component positions, suspension details and electrical requirements.
Should finish samples be approved before making the complete lighting sample?
For custom finishes, approving physical finish references before or during sample development provides a clearer benchmark for color, texture and surface appearance.
What should be checked on a custom lighting sample?
Review dimensions, proportions, construction, materials, finishes, glass, shades, decorative components, electrical specifications, workmanship and overall appearance.
What happens when the sample needs changes?
Required changes should be documented, the technical drawing should be revised, and the final approved information should replace superseded versions before mass production.
Why should the first production units be checked against the approved sample?
This helps identify differences in dimensions, materials, finishes, components or workmanship before the complete production quantity is finished.
How is consistency controlled during custom lighting production?
Use the approved drawing, physical sample, material references and finish samples as production benchmarks, supported by in-process and final quality control.
How should large custom chandeliers be prepared for export?
Large fixtures can be separated into identified components, protected according to material and fragility, packed with project-based labels and connected to a detailed component and packing list.
Published by Craftell Home · Custom Furniture Manufacturer & FF&E Project Supplier
Related decorative lighting project
Our published Omni PGA Frisco project describes the supply of custom chandeliers, pendant lights, table lamps, floor lamps and wall sconces. Review the stated supply scope when assessing its relevance to your own project.
This article provides manufacturing and procurement guidance. The final product configuration, acceptance criteria and delivery scope are defined by the approved drawings, specifications, samples and order documents for each project.
Explore Lighting Project Resources
Continue with our lighting solutions and selected projects.